

A certificate warning can appear even when a video connection is encrypted. The connection may be protected, but the receiving system still needs a way to verify that it has reached the correct server.
ITVDesk Certificate Management lets administrators save a shared certificate for RTSPS and camera HTTPS services, or assign a separate HTTPS certificate to an individual camera. This guide explains the installation steps, client trust, and what to check when replacing an existing certificate.
Prepare the Certificate Before Changing a Working System
Obtain a server certificate and its matching private key from your certificate administrator or approved certificate provider. ITVDesk loads PEM-formatted certificate and key material. A filename ending in .crt, .cer, or .key does not by itself establish the file's format.
Ask for a certificate covering the address clients will actually use. A DNS connection should match a DNS name in the certificate's Subject Alternative Name (SAN); a connection made directly to an IP address needs the corresponding IP SAN. When one certificate serves several camera endpoints, account for every address used by those clients.
Make sure the receiving VMS/NVR supports the chosen certificate, key type, and trust chain. Keep a secure backup of the original pair. Never send the private key to a viewing client or distribute it as a way to establish trust.
Install the Shared Certificate
Open Settings > Security > Certificate Management. The Shared Certificate (RTSPS / HTTPS) section contains the certificate and private-key selection fields.
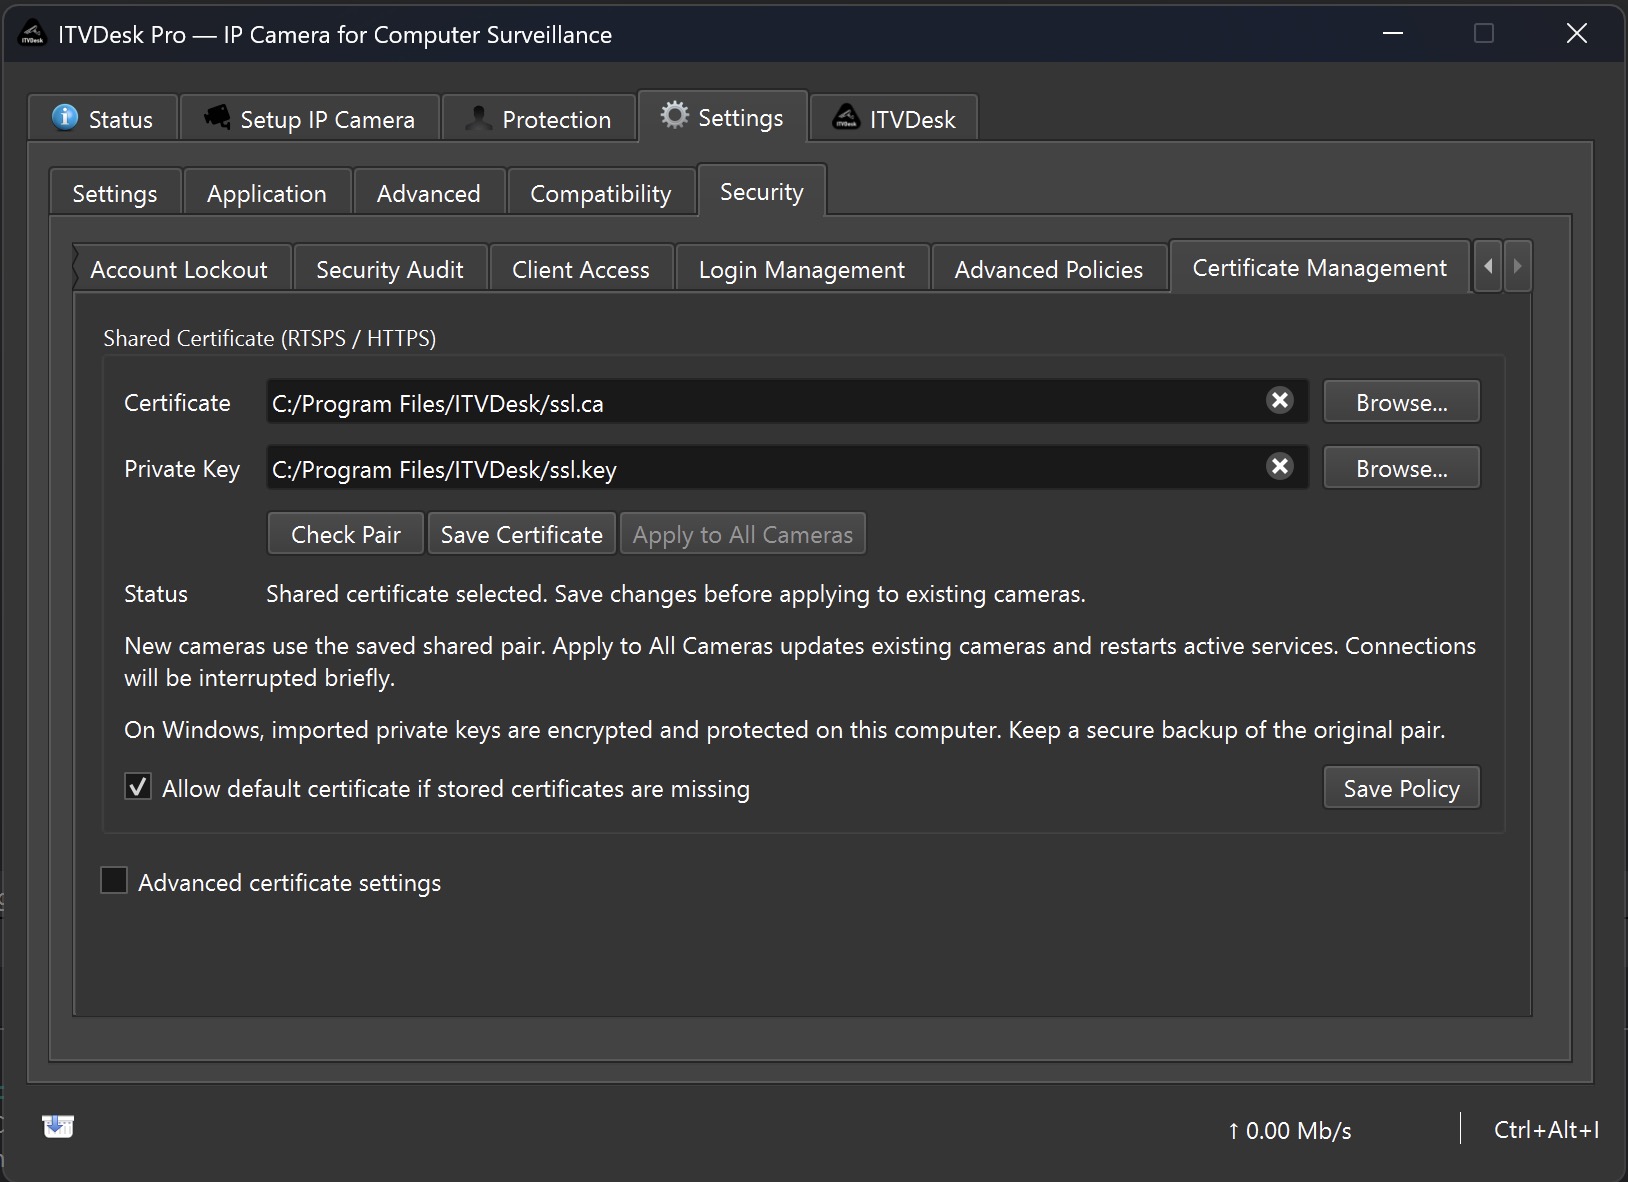
- Use Browse... beside Certificate to select the server certificate file.
- Use Browse... beside Private Key to select its matching key.
- Click Check Pair and review the status message.
- Click Save Certificate to store the selected pair.
Check Pair is a local validation step. A matching pair does not prove that the client trusts its issuer, that the connection address matches the certificate, or that the certificate is valid for the deployment. Check the validity dates and trust requirements separately.
On Windows, imported private keys receive additional protection on the computer. The original source files are not deleted by this operation; protect those files and their backups appropriately.
Apply the Saved Pair to Existing Cameras
Saving the pair and applying it are separate steps. New cameras use the saved shared pair. To update existing cameras, click Apply to All Cameras after saving.
This is a bulk replacement: it replaces any separate certificates assigned to existing cameras with the shared pair. Do not use it when those cameras must retain their individual certificates.
Review and confirm the application's prompt. Applying the pair restarts the streaming services and active HTTPS cameras, so connected clients will be disconnected briefly and may need to reconnect. Stopped cameras remain stopped. Ports, authentication, and transport choices are not changed by this certificate operation.
In Server Mode, use the configuration workflow indicated by ITVDesk. If the application asks you to open Server Configuration, do that before applying the certificate; a separate management window does not necessarily control the active services.
After applying, read the status message. If a service did not start, check the reported certificate, port, or service problem rather than assuming that a saved pair is already in use.
Assign a Certificate to One Camera
Use Advanced certificate settings when a camera needs its own HTTPS certificate or when you want to assign the shared pair to one camera without changing the others.
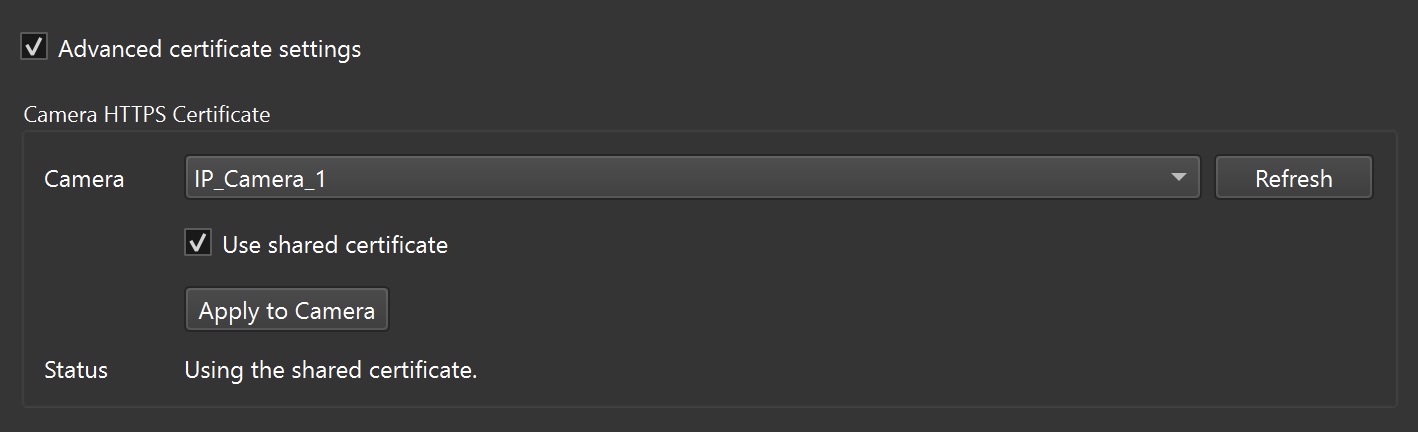
- Enable Advanced certificate settings and select the target in the Camera list. Use Refresh if necessary.
- Leave Use shared certificate selected to use the saved shared pair. Clear it to select a separate certificate and private key for this camera.
- Check the separate pair when applicable, then click Apply to Camera.
- Restart the selected camera as instructed by the status message so that its HTTPS service uses the saved choice.
These advanced settings concern the selected camera's HTTPS certificate. They do not create a separate RTSPS certificate for each camera; RTSPS uses the shared streaming-service pair.
Enable HTTPS and Configure Client Trust
Installing a certificate does not automatically enable HTTPS on every camera. In the camera's Add/Edit settings, enable ONVIF over HTTPS and use the configured HTTPS port when adding the camera to a compatible VMS/NVR.
Configure the receiving system to trust the issuing certificate authority, including any required intermediate certificates, using that product's documented procedure. For a self-signed certificate, use the client's supported explicit trust procedure and verify the certificate through a trusted channel. Not every VMS handles self-signed certificates or trust stores in the same way.
Do not solve a trust problem by permanently disabling certificate verification. Check the address used, certificate validity, workstation time, issuer trust, and the chain presented to the client.
HTTPS protects the connection using it, not every other connection to the camera. For media transport, verify the actual RTSPS, SRTP, or HTTPS-tunneling mode supported by the receiver. See the ITVDesk Security Hardening Checklist for the wider deployment checks.
Replace a Certificate Without Surprises
Plan replacement before the current certificate expires. Keep the previous pair securely until the change has been verified, and prepare any required client trust updates in advance.
For a shared replacement, select the new files, click Check Pair, and then Save Certificate. Use Apply to All Cameras only if all existing camera certificates should be replaced. For a camera-specific replacement, use the advanced procedure instead.
Allow for the relevant restart and reconnect, then verify live video, recording, and the HTTPS/RTSPS connections used by the deployment. Confirm the certificate presented by the endpoint after the restart. A successful file save is not proof that a running listener has reloaded it.
Understand the Default-Certificate Recovery Policy
The option Allow default certificate if stored certificates are missing controls a recovery fallback. It is not automatic certificate renewal and does not establish client trust in the default certificate.
Decide whether fallback is appropriate for your installation. Where only the approved deployment certificate is acceptable, disable the option and click Save Policy. Follow the application's restart instructions for existing services, and document how an administrator will restore the approved pair if it is lost.
Common Questions
Why does a warning remain after Check Pair succeeds?
The pair can match while the client still rejects the certificate's issuer, name, dates, or supported cryptographic parameters. Local pair validation and remote trust are different checks.
Do I need to share the private key with the VMS?
No. The private key belongs on the server and in its secure backup. Client trust normally uses public certificates or certificate-authority material, not the server's private key.
Will Apply to All Cameras preserve individual camera certificates?
No. It explicitly assigns the shared pair to all existing cameras. Use the advanced camera-specific controls when individual choices must remain separate.
Does Apply to Camera immediately restart the camera?
No. It saves the selection. Restart the selected camera as directed by the status message to apply it to the HTTPS service.
For certificate or connection questions, contact ITVDesk support with the ITVDesk version, receiving-system version, and the error message. Never include a private key or account password in a support screenshot.